Almost every office chair has a height adjustable feature, allowing the users to customize the height to their choice. Such an adjustment is done by an instrument called a Pneumatic cylinder often referred to as a gas cylinder or gas lift. It happens to some users that their chairs start sinking and do not keep in place, leading to quite frustrating conditions.
In 99% of cases, a malfunctioning gas lift has been found as a culprit, failing to not keep the chair in place.
In this guide, we will talk in detail about ‘how to fix office chairs from sinking’ and what are tips to solve this issue.
There exist multiple ways to fix a sinking office chair, the best and most effective way is to replace the malfunctioning pneumatic cylinder with the best one. Unlike other chair parts, the pneumatic cylinder is sensitive and explosive, and it is suggested to never repair it by yourself. Don’t go for a cheap cylinder as it will cause the problem again. Always install a high-grade cylinder like grade IV which performs well and can last for years.
If you don’t like purchasing a new cylinder, you can try the following steps to fix the sinking.
Ready-made Kits
There comes a number of ready-made kits to fix the sinking office chair. These kits work well with most chairs. I have chosen the two most effective kits that will help you to fix the sinking issue, saving the plenty of bucks from buying the new pneumatic cylinder.
1. Using Pneumatic Cylinder Holder
The cylinder holder also known as the chair saver kit is one of the cheap and most liked methods to fix the sinking. It works well for most office chairs (including stools, gaming chairs, executive chairs, etc) with a cylindrical diameter of 25-28mm or less.
The kit consists of the following 3 parts.
- Metal (stainless steel) sinking clamp.
- Hexagon wrench.
- Screw (2)

Installation method
- Adjust the chair to the height of your choice and mark it.
- Loose the screws and wrap the loose clamp around the metallic part of the pneumatic cylinder.
- Take the wrench to tighten the screws.
- The whole process takes a maximum of 5 minutes and you’re done. This will keep holding the cylinder in place, efficiently stopping it from sinking.
Pros
Cons
2. Using Plastic Pipe Grooves/Sleeves
This method uses a kit consisting of 6-8 pieces of steel hose clamps and 3-4 pieces of plastic pipe grooves. You will also get a screwdriver with the kit.
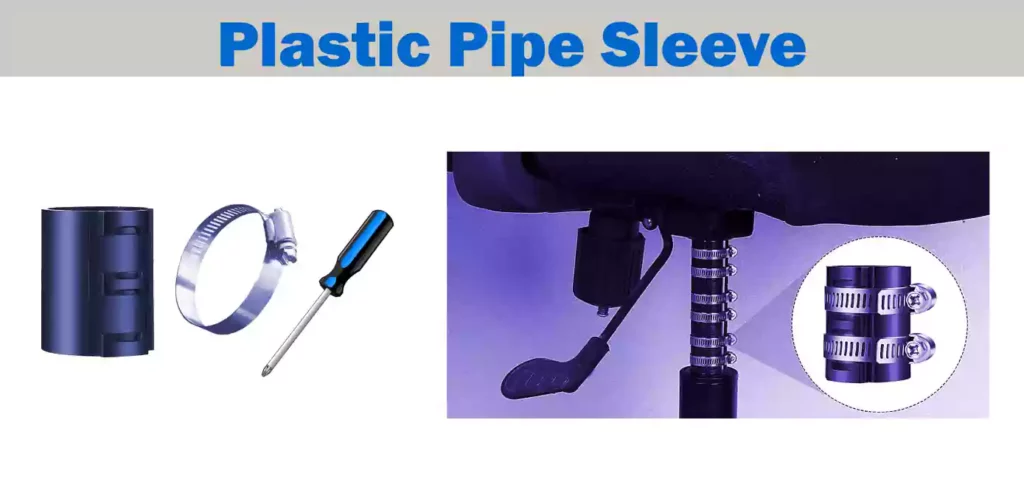
Installation Method
- Adjust the chair to your preferred height and use a marker to mark the metallic part of the cylinder.
- Take a piece of plastic pipe groove and wrap it around the metallic part.
- Wrap the clamp around the groove and tighten it by using the screwdriver.
- You can use the number of the plastic groove as per your need. Save the unused grooves and hose clamps for future use. The grooves can be removed if you like to lower the seat height later.
Pros
Cons
DIY Methods
These methods do not require pre-made kits, rather you will be using the easily accessible items by your own.
Using PVC Pipe
Alternatively, you can use the PVC pipe as a groove. This method is a bit cheap but it requires more effort than the others and you will be able to effectively fix the sinking problem of your chair. Some PVC pipes do have not enough thickness and exhibit more flexibility. Better to choose a pipe with more thickening.
Items needed
- A length of PVC pipe (10-12 inches).
- A saw or pipe cutter.
- Hose clamp (10 pcs).
- Screwdriver.
Steps to follow
- Take a saw or pipe cutter to cut the 2-3 inches pieces of PVC pipe. Usually, 3-4 pieces work well for most users. Cut the pieces according to the length between the cylinder and chair base.
- Make an entire cut on the lateral side of each piece to make it a groove.
- Raise the chair seat to your desired height.
- Take a piece of pipe groove, slightly open it, and wrap it around the metallic rod of the pneumatic cylinder.
- Use the hose clamps to tighten the upper and lower parts of the pipe groove. Take the remaining pieces of pipe and install them like the first one. That’s it.
- You can easily raise and lower the seat height by adding and removing the pieces of pipe, respectively.
Pros
Cons
Using Hose Clamp
This method requires the usage of a hose clamp which prevents the chair from moving down.
Items needed
- Hose clamp (stainless steel).
- Screwdriver.
- Anti-slip tape.
- A piece of clean cloth.
Installation Method
- Raise the seat to the height of your choice and mark the cylinder.
- Use the cloth to remove the dust and dirt from the cylinder.
- Wrap the cylinder with layers of anti-slip tape. This will help the clamp in better gripping.
- Finally, wrap the clamp around the cylinder at the marked point.
- Use the screwdriver to fasten the screws so that the clamp gets tightened perfectly.
- Now, sit on the chair to confirm whether the clamp is preventing the sinking or not. It must be working fine to stop the chair from down.
Pros
Cons
Conclusion
All of the above methods work equally well for office chairs. They are meant to save your bucks from buying new and expensive pneumatic cylinders. It’s up to you whether you like a ready-made kit or a DIY method. The earlier has been found easy to install while the latter requires a bit more effort.
If you have patio chairs with broken straps, you can easily retrap them by following our detailed guide on ‘how to restrap patio chairs‘.